Pages

Friday, January 29, 2010

Framed Hearts

I have these pink plastic things that I think are supposed to be like rocks. There were used as filler in a vase full of sock flowers from my baby shower. They mostly just sit in their little plastic baggy...that is, unless, my little one finds them. She thinks they are super fun to dump all over the floor. I decided to do something with them (I'm trying really hard to use up things that I have so that my craft corner stays just that - a corner!). Here is what I whipped up last night, I think it turned out super cute.
I took a frame from the dollar store & painted it white, cut a piece of scrapbook paper to fit, glued the rocks into hearts shapes and then embellished the side of the frame a little.My hearts aren't perfect but that's because I was too lazy to print out heart shapes and just eyeballed it.

Check back after Valentine's for a fun St. Patrick's Day craft using the glass from out of the frame. I'm super excited for that one!


Photobucket

Wednesday, January 27, 2010

Personalized Wall Hanging - Tutorial

I've been wanting to put my daughter's name up on one of the walls in her room. My only problem was that I didn't want to have to buy anything to do so (I know, I'm cheap). Here is my solution:


For this project I used:
14 pieces of 6" x 6" paper
7 pieces of ribbon (I think mine were around 14" long)
Printer
Razor blade/Xacto knife

First, I printed out the letters for her name onto paper (I adjusted the paper settings in Word to 6" square pages and then made the font as big as would fit).

Then I cut out the letters with a good ol' fashioned razor blade. At times like this I wonder if I'm the only person who doesn't own a Cricut!

Here is what mine looked like:

Then I lined up the pages with cut out letters on top of coordinating pages.

I liked that the two sheets were a little offset. Then I punched holes in the top corners and put ribbon through them.

I used thumb tacks to hang them to her wall. I think I might glue little bows onto the tacks to cover them up.

Here is the view from her door.


Grand total: FREE
Can't beat that! :)

Tuesday, January 26, 2010

Coconut Pecan Chicken

Here is what you need:
-3 chicken breasts
-1/2 C Flour (roughly...I don't usually measure this kind of stuff)
-salt
-pepper
-2 eggs
-1/2 C bread crumbs (next time, I think I'll use Panko)
-1 1/2 C coconut flakes, sweetened
-1 1/2 C pecans

I cut up the chicken breast into strips (cheaper than buying tenders), mixed some salt & pepper into the flour, beat the eggs slightly, gave the coconut a rough chop and put the pecans through a nut grinder. I mixed the coconut, bread crumbs and pecans together. First stop, flour mixture. Second stop, eggs. Third stop, coconut, crumb, pecan mixture (I used my fingers to press this into the chicken so that it stuck good). Then onto a foil lined baking sheet and into the preheated 450 degree oven. I let them hang out in there for about 20 minutes. I would recommend flipping them half-way through cooking. I didn't do this and there was a little bit of a soggy spot on the bottoms (so I tossed them under the broiler for a few minutes and that helped a little).

The yellow goop next to my chicken? A pineapple sauce that I am still working on perfecting.

My only complaint?

There weren't any leftovers!

Monday, January 25, 2010

TMOC Part 1: Gingerbread Man Yard Stake

Twelve Months of Christmas Part 1 is complete! I saw this idea on the Michaels website last year and loved it so I bookmarked it (I had planned on giving it away last Christmas but didn't). I went to pull it up the other day to look at the picture so I could see how they did the face of the gingerbread man and it was no longer there. I got a page that said "project not found". I guess just bookmarking isn't always a safe bet! Luckily, I remembered the picture well enough that I could still construct it and I think it turned out pretty cute! What do you think?


I used one 6.5" circle and two 2" circles that I painted brown (spice brown to be exact...which I thought was very fitting) for the head and hands. Then I painted white wavy lines to mimic icing and added a face to the larger circle. Like I said before, I couldn't find the instructions any longer so I just kind of made it up as I went. I did trace the eyes first so that they would be even...I should have done the same for the cheeks (which are pink, despite how they may look in the picture). Too late now! I painted the sign part of it all white and then added the green border. I did NOT paint the words, however. My painting skills are very limited, but I'm pretty good with a Sharpie so I just wrote out "welcome". I also cheated a little bit on the stripes for the stake...I drew lines (again, with a Sharpie) so that I knew where to fill in the red and to make sure they were straight. I glued it together, added a coat of sealer, tied some raffia in a bow and tada! One less thing to stress about come Christmastime. I can't wait for February's project! :)

Thursday, January 21, 2010

Double Duty Calendar

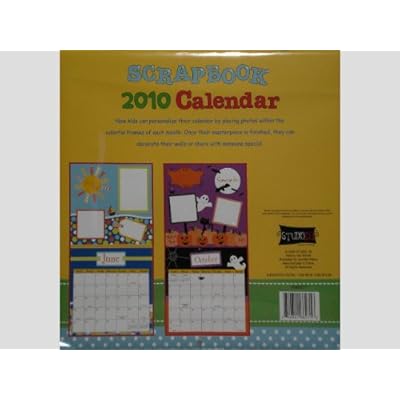
I'm a list maker. There is just something so satisfying about crossing things off of a list. I like to have a list of the projects I want to accomplish. Last year I just wrote on my mirror (with dry erase marker...one of my favorite places to make lists) what I wanted to get done each night for that week. This worked great at first...but then I got behind and it was screwing up my lists. In case you're not a list person (and if you are, you totally understand) this is unacceptable. So I decided to do things differently this year. I procrastinated purposely waited until half way through January to buy a new calendar. This actually worked out quite well because I got a $10 calendar for $1! Yay for Michaels. It is actually a scrapbook calendar (meant for kids, but who cares...it's still cute) with places for journaling and pictures.

*photo courtesy of Amazon.com*

I just write down (in one of the places for photos since it can be covered later) what I want to accomplish in terms of crafts for the month and then I can cross it off when it's done. Why is it double duty? At the end of the year I plan to cut it apart and then I'll have 12 new scrapbook pages already laid out just waiting for pictures and journaling. FOR ONE DOLLAR!!!

Yes it was just luck this year, but I LOVE it and plan to do this in years to come.

Tuesday, January 19, 2010

Diaper Cake


I wanted a creative way to give the bibs at that baby shower, so I decided to make a diaper cake (with diapers I had on hand that no longer fit my little one). I had never made one before but I think it turned out pretty cute. I was pleased with it. I saw on some blog (which I didn't bookmark and now for the life of me I can't find) where she made a diaper cake that didn't require rolling each diaper up and wrapping in a rubber band. I was totally on board since the one thing I hated about the diaper cake my sis-in-law gave me when I was pregnant was unwrapping and unrolling all those diapers! Sorry that I can't tell you whose idea I stole! I know it looks a little crooked in the picture, but it wasn't in real life (at least I don't think it was!).

And the best part? The instructions called for an empty toilet paper roll to put in the middle of the bottom tier, but since my family has a thing for gifting cans of Tab (more Tab creations here)...


Yep, I stuck a Tab in the middle of the bottom. It was awesome because the mommy-to-be totally didn't expect it!
Totally easy and super cute. I think I'll be making these in the future!

Sunday, January 17, 2010

Shoe Revamp

Inspired by this post from Make It & Love It, I decided to Mod Podge my shoes! That's right, I took this pair of shoes (that I got on sale at Target for under $5!)...

(I know there is only one shoe in this pic, but I had already started on the other shoe before I thought to take the picture.)

...and turned them into this!


I like them. I'm not sure I LOVE them...but I definitely like them. I think I would love them if the Mod Podge hadn't darkened my fabric quite so much. They were supposed to be a nice milk chocolate brown but once I put the Mod Podge on, they turned more of a brownish-black. Oh well! Also, I think if I were to ever do this again I would use more of a cottony fabric instead of a satin-ish one. But it still gets the thumbs up!

Thursday, January 14, 2010

Ruffled Bed Skirt

Yep, this is the one that I lost part of my finger over.
As I said before I saw a tutorial for this that I super liked. I found it on Burlap + Blue. She calls it the $4, 45 minute bed skirt. Well mine was neither $4 nor 45 minutes. But she used the cheapest fabric she could find and only covered part of her bed (which must be a smaller size than mine because she had 75 inches to cover and I had 220!).
I used a sheet that I cut into strips to make mine. I got the sheet set in June right after we moved (at Ross for $25) and used the flat sheet to make curtains. I had always intended on using the rest of it to make a bed skirt, since we got bed risers which made our old bed skirt 6 inches too short. I am really pleased with how it turned out. And I super love that when I walk into my room I don't see a preview of the piles of stuff that reside under my bed!


Do you like my matching curtains? :)
*please excuse the mess that is my crafting area*

After I finished it and we got the mattress back on the box spring and made up all pretty, Zach looked at me and asked "So was it worth losing part of your finger for?"

And this was too cute not to post...while I was pinning the fabric to the "base" of the bed skirt, the mattress was leaned up against one of the walls in the hall. It became quite the fun zone. :)


*If you want pictures of my finger you can click here*

Tuesday, January 12, 2010

Initial Bib

My cousin and his wife are expecting their first child and the baby shower is this weekend. They are having a boy. I found that I had a hard time coming up with an idea (since I only have a daughter) but once I came up with something the creative juices started flowing. So now I'm hoping that my older sister (who is also expecting) has a boy this time so that I can try out my fun new "boy ideas".
Here is what I came up with for little baby J.

 I took a little help from Target and purchased the bibs, but then added the Js and stars. It was so much fun and I LOVE how they turned out!

Monday, January 11, 2010

Out of the office...

Well, not actually but I'll be taking a self-inflicted break from crafts and blogging for an undetermined amount of time. Although I do have a post already scheduled to go up tomorrow and one on Wednesday but after that I don't know when I'll be back up and running.

Why?

I found a pair of ballet flats at Target today on sale for under $5...but they are a plum-ish color and while I like the color I don't have a whole lot that I could wear with them. So I thought I would just Mod Podge some brown fabric to them. Love the idea...except I don't have any brown fabric. And then I came across a tutorial on a ruffled bed skirt that I liked and I've been meaning to make me a new one of those since June. I realized that if I did that I could use the brown fabric from my current bed skirt to recover my shoes. Perfect! Now I don't have to go buy fabric. So I got to work cutting the sheet fabric into strips for the new skirt. I did my math so that I knew how much I needed to cut to get a good ruffle. Well by the time I had enough for that there was only one more strip of fabric so I figured I would just cut that up and I would have a fuller ruffle. Why not? Three quarters of the way through cutting the strip I feel this stinging sensation and yell to Zach "I NEED A BANDAID!!!" pause "NO, A WET WASHCLOTH!" Yep, I sliced off part of my finger with the rotary cutter. I guess it was hanging over the edge of the ruler I was using as my guide. I got it probably about 1/8" deep and from about the knuckle to almost the edge of the nail. If you are confused about this (my mom said she kept trying to figure out all the way home from work how I had cut my finger with the rotary cutter) I'll probably post a pic in a few days on my family blog. And since I am tired of having to look at the keyboard to type since I can't use my left index finger I'll leave it at that.

Hopefully I'll be back soon!

Hot Chocolate On A "Stick"

When I saw the idea of making hot chocolate on a stick on Giver's Log I just had to try it! My only complaint was that the sticks used were too...umm, shall we say, plain? I immediately knew just how I wanted to do mine. 


Introducing...flavored hot chocolate on a stick!


Flavor Number 1 - Cinnamon Hot Chocolate
I followed the instructions given except I used a cinnamon stick in place of the craft/popsicle stick and sprinkled a little bit of cinnamon onto the chocolate that I dipped the cubes into. 


Flavor Number Two - Peppermint Hot Chocolate
How stinkin' cute are these! I super love them! They are so cute I almost had a hard time putting one into my heated milk...almost. It was divine! It had just the right amount of peppermint for me. And the nice thing about using the candy cane as the stick is that if someone prefers a stronger mint flavor they can just stir more of the candy cane in. 
My variation - use candy cane (cut off the crook part of it) for the stick, dip hot chocolate cube into melted white chocolate and then dip in crushed candy cane. 


I also tried making a Peanut Butter Hot Chocolate. I had never seen this before and yet in every other type of dessert is seems that chocolate and peanut butter get paired together, so why not hot chocolate? I'm still tweaking this version. It had WAY too much peanut butter in it, but it wasn't bad if mixed with a plain hot chocolate cube. 


Here are a few suggestions if you plan to make these on your own: 1. place your ice cube tray into very shallow hot water for a few seconds to loosen the cubes once they are set up. Don't get the water onto your chocolate cubes. I had a hard time trying to get mine out at first (I actually broke one of the candy cane sticks) and this helped a ton! 2. The recipe says to use 8 servings of prepackaged hot chocolate mix in case you don't want to make them from scratch. I don't know if my hot chocolate packs were larger than most or what, but I found that to be WAY too much. For my second batch I measured out 3/4 C of hot chocolate mix and had much better results. 

Sunday, January 10, 2010

My New Years Goals

I'm not really one for making New Year's Resolutions. But this year, after Christmas was over I felt this sense of relief and felt that it was a good time to make some changes. I have already cleaned out/reorganized part of my bedroom, specifically my crafting area. I'm not finished, but I now know where all of my supplies are! Wohoo! Since my craft supplies are organized and easily accessible, I figured I should use them more. So in addition to my 12 Months of Christmas (which by the way, I've started some of the purchasing of supplies and I'm way excited) I decided to be less of a lazy bum. There I said it.

So, what's my plan? Assign each night of the week to a certain craft. For example, each Monday night make at least one scrapbook page. What are my craft categories? Scrapbooking, card making, hair bow making, 12 Months of Christmas/birthday gifts, date night with my hubby (ok I know this isn't a craft, but it's still important), & last but not least blogging (I haven't decided for sure which night of the week I'll work on what). Yes, that's only six, but a girls gotta have a night of rest. So even if I only do one card or one scrapbook page each night by the end of 2010 I will hopefully have quite a bit to show for myself. Which is more than I can say for 2009!

So here's to a more productive year!

Candy Cake

You know, like a diaper cake but with candy! I was inspired by this post from Cheap Chic Home. As soon as I saw that I thought of my dad and decided to make him one for his birthday. All of my candy was about equally sized and so I didn't have any small candy to fill in the gaps. My solution? Curling ribbon!

I contemplated covering the styrofoam in paper before gluing on the chocolates but decided that that was too much effort. However, I think that if I were to do this again I would cover the styrofoam first.

Wednesday, January 6, 2010

Brownie Forest

I took these to a family Christmas party. I thought they were super adorable, and so I was bummed when I overheard someone talking, disappointedly, about how they looked like they had glitter on them. They are sprinkles!

All I did was make a box of brownies and once they cooled I frosted them (with canned frosting) and then covered with clear sprinkles which you can't really see in this picture, but oh well. I also took some tree shaped pretzels, which I found at Sam's Club, and dipped them in white chocolate that I melted and added green food coloring to. They also got a generous dose of sprinkles. Stick the pretzels into the brownies and voila! You have a cute little brownie-pretzel forest.

Tutorial: Shower Curtain Ring Turned Bracelet

In case you missed it when it was part of Readers Tutorial Week on Craftaholics Anonymous, here is my tutorial for Shower Curtain Ring Bracelets.


A lot of what I do is someone else's original idea that I just tweak, but every once in a while I get a stroke of genius. Like these Shower Curtain Ring Bracelets!

Materials Needed:
- one cheap plastic shower curtain ring (you don't have a dozen of these just lying around the house? check your dollar store)
- 2 coordinating ribbons (length needed will depend on the width of the ribbon and your particular ring, give yourself at least 18 inches for wrapping and 12 inches of another ribbon for the bow)
- lighter (or whatever you prefer to use to prevent fraying)
- hot glue gun (can you believe I was married for two years before I had one of my own? me either!)
- scissors

Step One:
Heat seal one end of the ribbon that you plan on wrapping around the shower curtain ring (sorry I'm just not talented enough to take a picture of myself burning the end of my ribbon and I would have enlisted the hubbs but he was ever so sweetly folding the laundry).

Step Two:
Put a glob of hot glue (not too much, since as I'm sure you all know, it will ooze as you press the ribbon on it) on the inside of your shower curtain ring (which from here on out will just be referred to as "ring") right where the thick part of the ring meets the thin part that usually goes through the holes of your shower curtain, and press the ribbon down firmly.

Step Three:
Wind your ribbon around your ring, slightly overlapping the edges. This might take a little bit of practice at first  the get it to line up just right since the ring probably narrows just a little bit.

To make winding a little bit easier you can either put a dab of hot glue every couple of "laps"...

...or put an alligator clip on the ribbon that you have already wound to hold it in place. Make sure you pull tight on the ribbon as you are winding it around the ring! This helps prevent bunching.

Step Four:
When  you get to the other end of your ring, put another dab of hot glue on the top of the ring and press the ribbon down.

Step Five:
Pull your ribbon to the bottom side of the ring and figure out where you need to cut it to cover up the last little bit of ring showing. Cut, heat seal (or fray-check...whatever, it doesn't matter), and glue the puppy down!

Step Six:
Take ribbon number 2 and tie it into a bow around the narrow part of the ring (which should be the only part showing by now). Tie the knot so that the ribbon goes the same direction as the ring (you don't want the ring and ribbon to make an X or your bow will be sideways).

Cut tails of bow to desired length and heat seal. TADAA! You've just made a super cute bracelet!


You can even change the bow to coordinate with a different outfit.

So many possibilities!


A FEW NOTES:
- These fit my 1 1/2 year old and my 5 year old niece (ok, and me but I have to open the ring to get it on and I have freakishly thin wrists) so they are great for lots of different ages.
- If you are like me and don't want to have to retie the bow every 2 minutes you can stitch it shut. Or maybe your child won't untie it. You will still be able to change the bow out. Just open the ring and slip it off. It is a little tricky to get back on, but it can be done!

Tissue Paper Candles

In case you missed this tutorial when it was on Craftaholics Anonymous, here is it for you!
Today we are making candles...ok, well not actually making candles. We are decorating candles! This is a neat little trick my mother-in-law taught me a few years ago and I have used it several times since.
Here is what you need:
- a candle (no fakes here, you need wax)
- tissue paper
- stamp
- stamp pad
- scissors
- wax paper (this is optional, but it makes the job a lot easier and gives a smother finish)
- heat embosser (sorry, you can't just use your blow dryer...trust me, I've tried)

Step One:
Ink your stamp and stamp your image onto the tissue paper (it doesn't matter which side)

Step Two:
With scissors, cut out your image making sure to cut close to the edges (this is more important if you are using a colored candle, or colored tissue paper, less important with white tissue paper on a white candle).

Step Three:
Place the cut out image where you would like it to go on your candle and wrap wax paper around it. Be sure to put the waxy side facing the candle. You can hold the wax paper in place, but if you prefer to you can tape it down.

Step Four:
Heat with your heat embosser until the tissue paper becomes transparent. You will notice it changing as you heat it (just like when heating embossing powders).

Step Five:
Admire! Yep, that's really all there is to it! Ok, well you might want to remove the wax paper :)

You can also add other fun things like jewels or ribbon.

You can also use colored candles, but like I mentioned earlier you will want to be more cautious as you cut your image out from the tissue paper since you will probably be able to see the edges of it once you are finished.

Don't like the way it turned out? You can peel it off and start over! Also, the flash accentuated the edges of the tissue paper on my picture above, it looks better in person. And since you have your heat embosser out, you might as well give your candle a little extra dimension. Just pour embossing powder onto your stamped image before cutting it out and heat it before placing it on the candle. You can heat the powder while you are heating the tissue paper to the candle, but I have found that it causes my candle to melt more than I would like and makes the wax drip.

Don't have a stamp or ink pad? No problem! You can color on the tissue paper with markers, or chalks, or watercolors. Play around with it! It's tons of fun!

Monday, January 4, 2010

I need your help!

I know there aren't very many people out there who read my blog but I trust that you'll come through for me and help me out. I'm stumped! Along with my 12 Months of Christmas, I am trying to be better this year with birthday cards & gifts. I have already come up with most of the gifts I plan on making this year, however, I have no clue what to get for my Papa. Boys are hard enough to shop for but trying to come up with an idea for a man who is 43 years older than me has got me stumped.

I would love to hear your suggestions!!!

Saturday, January 2, 2010

12 Months of Christmas

Yes, you read that correctly. This year I'm planning on doing "12 MONTHS of Christmas"! What does this mean? I am going to make *at least* one Christmas gift each month throughout the year. Yes I am crazy and have already come up with several of the gifts that I plan on making. And that is on top of all of the gifts/cards for birthdays, mother's day, father's day, baby showers, etc. I have not, however, actually started making anything just yet. Tonight I plan on making a list of what to make each month.
WHY???
Two reasons. One - to not be so stressed out the week before Christmas trying to finish everything & Two - to hopefully have it feel more like Christmas all year long (the joy of doing things for others part of Christmas, not the so stressed I want to pull my hair out).

Hopefully this works as well in real life as I am hoping it will!